Showing posts with label tip of the day. Show all posts

Monday, August 11, 2008

Tip of the Day - ISO

I'm sure you've noticed that in the last two tips there has been a trade off-- different benefits or effects depending on which way you take the element under discussion. In terms of aperture, a wide f-number yields one effect, isolating the subject against a blurred background, and a narrow f-number yields another, a deep range of focus to have all or many of the elements in focus. With shutter speed a photographer trades action stopping power for the ability to capture picture in low light.

The range of options available when talking about ISO (or film/sensor sensitivity to light) represents a similar type of trade off. A lower ISO number-- say 64 or 100-- represents the lowest sensitivity to light, but give the highest image quality in terms of graininess or "noise." Higher ISO numbers allow you to capture images in lower light settings, but add "noise" to the image, making them less and less suitable for enlargements.

Here are some examples to illustrate this point:


This image was take in full sun at the lowest ISO setting on the camera--100. The close up shows that the dark areas are nearly perfectly uniform.


This image, however, was taken at dusk and from some distance away. To allow shutter speeds that could remotely allow me to hand hold the camera, I bumped the ISO setting to the highest on this camera--1600. Notice the significant graininess or noise--especially in the darker areas.

If you don't plan to enlarge your images much beyond 5x7 then the higher ISO settings aren't too much trouble. The noise is not as noticable in smaller prints. At 8x10 or above, however, you should try to capture your images with the lowest ISO setting you can get away with.

Newer cameras manage image noise at the higher ISO settings much better. The newest Nikon professional grade DSLR, the D3, shows exceptional image quality, even at ISO 3200. See below:


The D3 can also go three full stops beyond 3200 to an astonishing 25600.


The ultimate take-home lesson from the tips on aperture, shutter speed, and ISO is to manage your ISO like you manage your shutter speed and aperture. Keep in mind the effect you are working for and adjust accordingly. If enlarging your images is important--keep your ISO low and open your lens wider or use a slower shutter speed. If capturing action is paramount--use higher shutter speeds, even if bumping your ISO up a little is necessary. To isolate that head shot against a blurred background, open your lens to its wider apertures.

So... how are your photographs improving? Post a comment here and let me know how you're doing and if you have any questions.

Tuesday, August 5, 2008

Tip of the Day - Aperture, part 2

The basic deal with regard to aperture has to do with the inverse relationship between the aperture and the depth of field (what I also call the range of focus). If you let your camera's software determine what kind of shutter speed you need to go along with a selected aperture*, then you can concentrate on choosing an aperture to achieve the effect you are looking for. More on that in a second.

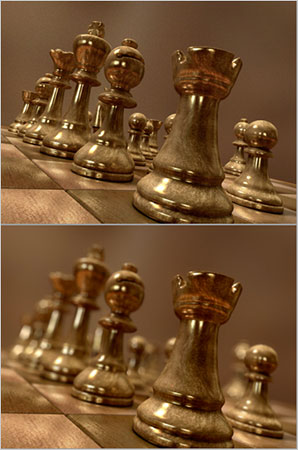
Nearly all photographic lenses have aperture setting measured in f-stops. The crazy, counter-intuitive thing is that a large f-stop number, like f22, indicates a very small hole in the lens. A small f-stop number, say f2, means a large hole in the lens. In the example below, image #1 is of a small f-number, and image #2 is of a large f-number.


As I wrote in part 1 of this tip, a large aperture means lots of light gets through to the sensor and requires the shutter to be open only a brief time (and, of course, the inverse is true, a small aperture needs a longer shutter opening). Another element affected by aperture is how much of the image is in focus beyond the exact spot where the lens if focused. This range of focus is called, as I mentioned, the depth of field. Depth of field means the depth, moving from the camera in a straight line in the direction the lens is pointed, of the field viewed by the camera that appears to be in focus to the viewer.


As you can see from the lower image, a larger aperture (smaller f-stop number) yields a narrow range of focus. Not much of the image beyond where the lens is focused appears to be in focus. A smaller aperture (larger f-number) yields an image (the upper image) that has greater depth of field or range of focus.

Okay, fair enough. The next question is: Do you care about the depth of field in your photographs? The answer, as with the rule of thirds, is: sometimes.

Let's take to examples from portrait photography to explain why you might want to pay attention to aperture and depth of field.


In this example, a photograph of just a couple of people, one of the effects photographers are sometimes going for is to have the main subjects in focus, but to have the background out of focus. Such an effect helps lead the viewers eye to the subject. To achieve this effect, select a large aperture, if conditions allow, and allow your camera to select the appropriate shutter speed.


If the portrait is of a larger group, however, the photographer may want to have a greater depth of field to make sure the everyone in the photograph is clearly in focus. To achieve this effect, select a smaller aperture, and again, if conditions allow, let your camera select the proper shutter speed.

Other conditions where aperture control is useful are macro (close up) photography, photographs of flowers, online auction pictures, and landscapes (though each of these requires slightly different aperture settings).

We haven't yet addressed what to do if conditions DON'T allow you to select the aperture that you desire. We'll discuss those options later on. Stay tuned.

Up next, how does shutter speed affect image quality?


*By the way, this setting is called aperture priority. Check your camera. I'll bet it has this mode. More on modes in another tip.

Tip of the Day - Aperture, part 1

I taught a photography mini class not too long ago and I realized in talking to those students that not everyone knows the three basic physical elements that determine the exposure of a photograph: aperture, shutter speed, and ISO. A basic understanding of these three things gives a photographer much more control over what kinds of picture he/she will achieve.

Basically, aperture (also called f-stop) is the size of the hole that lets light through the lens (similar to the pupil of your eye). Shutter speed is how long the shutter is open to let light through that hole. ISO is another term for film speed, which is a measure of a film's (or digital camera's sensor's) sensitivity to light. These three elements combine in many different ways to achieve different results.

Before we discuss how aperture creates story, let's look at how the three elements work together. To achieve a properly exposed photograph (saying nothing, for the moment, about composition or color or anything else) the camera must receive the "right" amount of light on the film or the sensor. Let's call that amount X. Amount X is roughly the same for each ISO setting or film speed. X is equal to 100 for 100 speed film or an ISO setting of 100 on a digital camera (there is some complicated math behind this, if you are interested). Depending upon how much ambient light is available in the scene you are photographing, the photographer (or the camera) adjusts the aperture and shutter speed to get the needed amount of light to the sensor or film.

A large aperture means that lots of light gets through the lens to the sensor at a time. A small aperture means less light gets through at a time. If lots of light gets through quickly, then the shutter does not have to stay open as long. If little light gets through, then a longer shutter speed is needed. Additionally, a sensitive sensor or film means that less light is necessary to achieve the correct exposure. Kind of basic stuff, but, as I said, not understood by some photographers and therefore worth reviewing.

I'll discuss shutter speed and ISO in more detail another day. Today I'm posting about the ways that aperture creates effects on the image you get (or the image you are trying to get). Take a look at part 2 of this tip, which is posted separately.

Monday, August 4, 2008

Tip of the Day - Rule of Thirds

While we were at Scout Camp a couple of weeks ago, a friend asked me if I plan what is the viewfinder when I take a picture. In other words, do I compose the picture before I press the shutter release. The short answer to that question is: sometimes.

There are occasions when just pointing and shooting is the best way to get the shot. Sometimes the action will slip away or the moment will pass and getting a technically good shot isn't possible.


This shot, for example, would have gotten away entirely if I'd tried to clean up the background or eliminate the other players in the foreground.

Most of the time, however, a little knowledge, a little planning, and some experience will lead to photographs that are, more often than not, well composed.

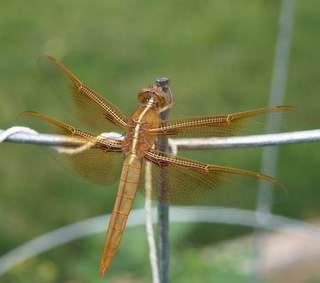
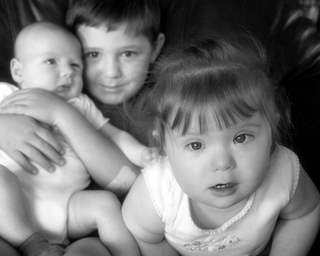
Here's some of the knowledge. First: though we strive for balance in our checking accounts and in our responses to our children's temper tantrums, balance in photographs is usually pretty boring. Having things a little off center is often more interesting to look at than something placed "plunk" in the middle of the frame. Compare these two images, for example:


and


In the case of the dragonfly, the composition is pleasing enough but it does nothing to convey any sense of story or movement or space.

In the case of the kids, doesn't your eye go to Cate first (she's the little dollie in the front), and then to the boys in the background (Cole and Cam). Because Cate is offset, the viewer can get a sense of space--a sense of depth. 

So, how do you "compose" a photograph while you are looking through the viewfinder (or later, when you are cropping in PhotoShop or Picasa)?

The "rule" operating here is the rule of thirds. Imagine your viewfinder (or your finished print) divided into thirds on both the vertical and horizontal. Like this:

If you place major elements in the frame along one of those lines you create what the Renaissance painters considered to be an image with story. They believed that the eye does not rest in the center of the image, but is more interested in things just off center. In fact, the best placement of the center of interest was where two thirds lines intersected (the green dots). 

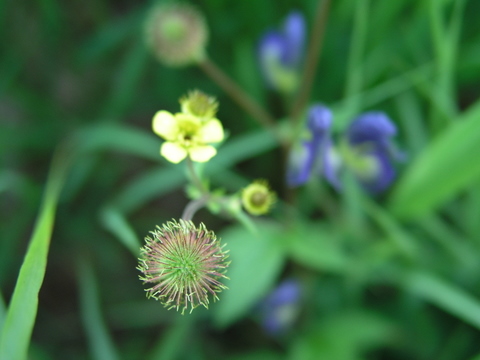
Take a look at one more example:

The yellow flower, the interesting seed pod (or whatever it is) and the blue flowers are all located along thirds lines and/or on the intersection of such lines. How does it look to your eye. Where does your eye go from moment to moment in looking at this photograph?

Of course, as with all "rules" the rule of thirds is meant to be broken from time to time. Can you take or find a photograph that breaks this rule but turns out to be visually interesting and to tell a story anyway?

Anyway, the answer to my friend's question is simply this: I try to compose to tell a story, and to do so often means looking for thirds lines and placing the center of interest in that general area.

Next up, how to use aperture to create story.